...Menu...
Menu Group: Transaction Processing: Calculate Checks: Print Checks
Manual checks are used for those instances where the payroll has been run and a check must be produced. This is a common occurrence in any payroll environment. A manual check may be posted at any time during or after the payroll run. If you post a manual check after you have printed the check register you must re-print the register. This gives you audibility for this situation. A manual check can also be used to simulate an employees gross to net. In this case you would post all the data for creating the check, calculate taxes, view the results, and cancel the process. You can also use a negative manual check to perform an adjustment.

Check header information is entered on the first frame. The check number can be any number representing the check document. If you choose to have the system print the check the click printable. Then the check may be printed using the standard Check Printing program. The week number represents the pay period for the manual check; the week apply represents the period where you want the check to be charged to. This is relevant mainly for quarter end processing where you may want to post the manual check to a prior quarter. In this case the week apply might be different than the week number on the check.
Check Methods are explained in this document.
The Check Types are:
V=vacation
B=bonus
T=termination
R=reversing
Blank=regular
The check type can have some significance in the tax calculation for example bonus checks
will not use the exemption for federal tax.
The Frequency will default to the value on the employee master and can be changed in this field.
To pay this check via a direct deposit click the Direct Deposit box.
Once you are finished posting the heading information then click the POST DETAILS button. The box below will be displayed; input the EBD representing the first earning line for the check: (You will be able to enter more earnings lines later)
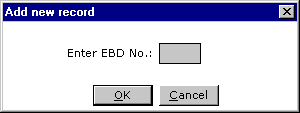
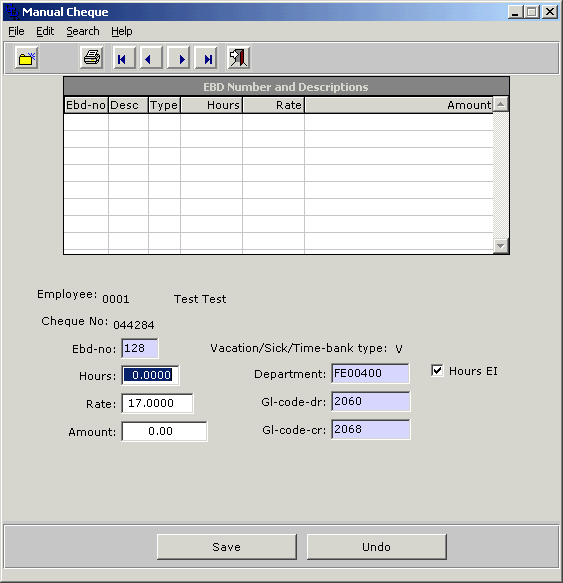
Upon entering the EBD and clicking OK, the frame below will be displayed:
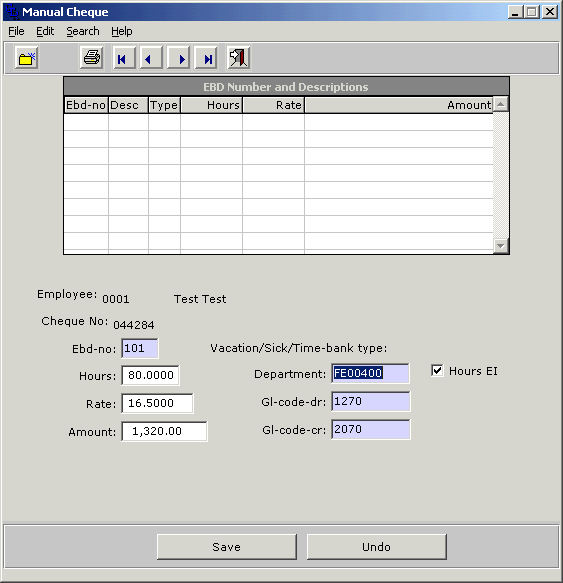
On this frame you will enter the details about the transaction line. In the example above we are entering the earnings using EBD 101. If you are processing a manual check for a Vacation or Sick Pay then the system will default the Payout type based on the following table. The table also illustrates the transaction code that will be used when the Vacation or Sick History files are updated once the manual check is processed.
| Payout Type | Manual Check type | History Transaction Code |
| Vacation - Regular | V | PM |
| Vacation - Lump Sum | VL | PS |
| Sick Pay - Regular | S | PM |
| Sick Pay - Lump Sum | SL | PL |
| Sick Pay - Family Leave | SF | PM |
Note that the Manual Check Type will only be defaulted if you are using different EBD's on the employees Vacation or Sick Pay table. If the EBD for Regular and Lump Sum Vacation is the same then you will have to enter the Payout Type. In this case the Payout box will be enabled (see below) and you will be required to enter the value as in the above table. The same will be true if you are using the same EBD for any combination of Sick Pay Payouts.
When you are finished posting the earnings portion of the transaction click on the exit button to go to the next screen.
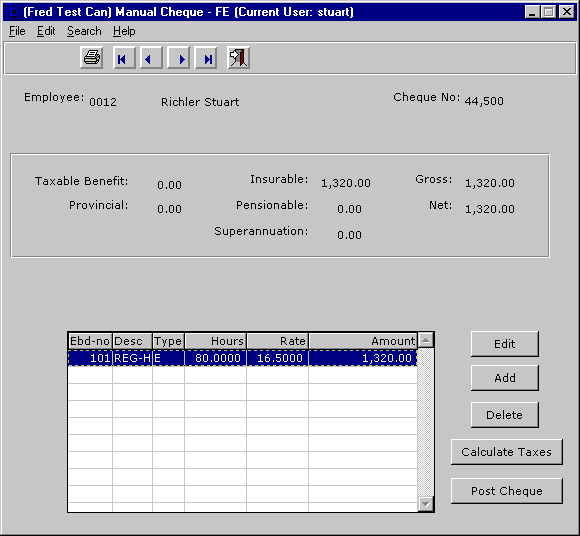
You may now EDIT existing lines or transactions on the check, add new transactions, or delete transactions. When you are finished you may click CALCULATE TAXES to have the system determine all the statutory and non-statutory deductions. This is the result:

As you can see the system has calculated all the taxes and employer shares. You can control the display of employer share by shutting off the Show Employer Share Setting in Payroll Settings. You may change the value of any of the generated lines via the EDIT button. Once you are finished click POST CHECK to finalize the check. If you are doing a simulation then just cancel the transaction.
Last updated October 20, 2006