GUI: ASN: Shipment Allocation
Menu Access: ASN 10
This module is where you build your shipments and create the ASN. The system will retrieve the shipment information, based on the bill of lading or packing slip from the database (MXP, Frameworx, Syteline etc) and create the basic shipment structure. Your job will be to assemble the shipment using the tools provided and based upon the partner and system definitions (defaults).
Building a shipment involves assigning items to cartons and then assigning cartons to pallets. Your requirement may be for a non pallet shipment or to ship individual items on a pallet or some combination of both. This program will allow you to arrange shipments in any of these combinations.
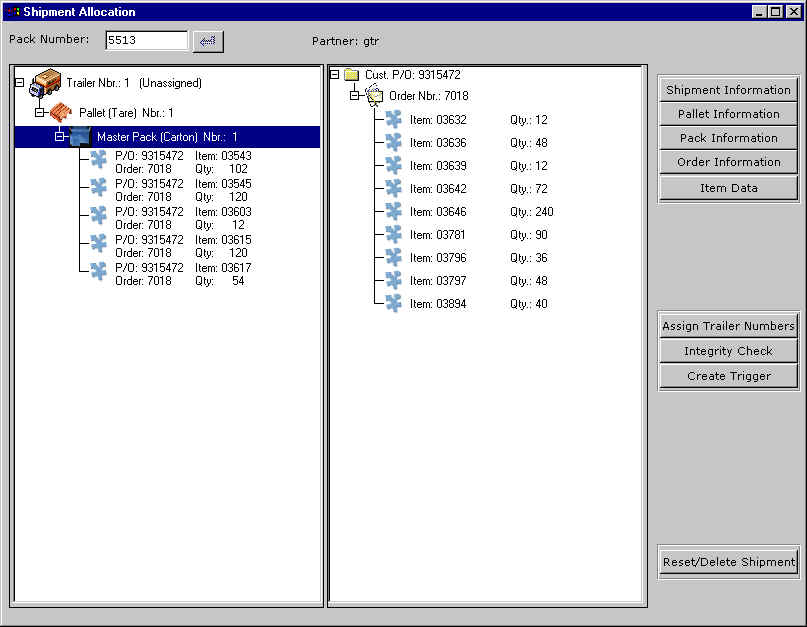
The GUI version of this program is presented above.
Follow these steps to complete the shipment. The step order is not forced. However, you cannot create the trigger unless you have completed all the other steps.
Step 1
The left hand side of the screen shows the shipment as it is being assembled. The tree structure root is the shipment level, subsequent levels are the order, pallet, carton, and item. When starting the carton assignments all the items will be listed in the right window pane. You can create pallets and cartons on the left side by highlighting the level and right clicking. You will then be presented with a menu listing the options that are available at that level. For example, you can highlight a carton on the left hand side and then highlight an item (or multiple items by using shift or control clicks) and then right clicking on the item or item list. You can then transfer all or part of the items to the highlighted carton. You can also create single or multiple carton/pallets by highlighting the truck or pallet.
Items can be assigned to cartons or pallets. They can be moved from the unassigned (right) window to the assigned (left) window. Items can also be moved within the left window, that is, from one carton or pallet to another. They can also be moved back to the unassigned (right) window.
Step 2
When you are finished assigning the items to their pallets/cartons you will enter the user defined fields. Some of these fields may be defined as mandatory. The system will not allow you to proceed to step 4 unless the mandatory fields are filled in. The mandatory fields are those with asterisks.
Step 3
Enter the trailer number by clicking on the Assign Trailer Number button. This field must be entered if you have checked the Trailer Number Required field in the Partner Information screen.
Step 4
Run the integrity check by clicking on the Integrity Check button. The integrity check will clean up the shipment by removing any empty cartons or pallets.
Step 5
After filling in the user defined fields you can create the EDI trigger by clicking on the Create Trigger button.
To illustrate we have created a BOL (#461) that will be shipped in 2 cartons on one pallet. The screens are presented in order of posting. An explanation is underneath each screen.
Screen 1
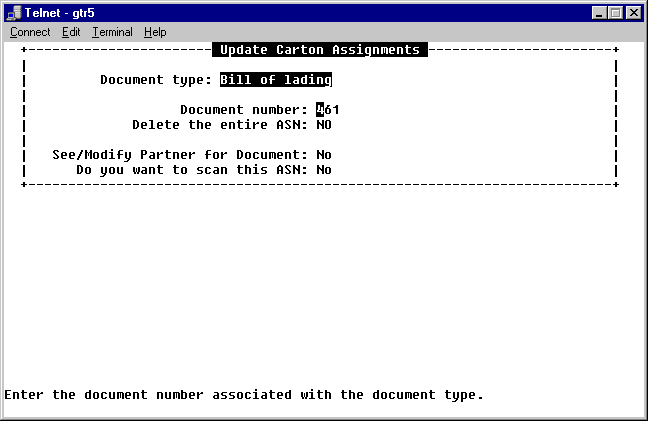
| Field | Description |
| Document type | Choose the document type. Currently this field will only allow for the Bill of Lading (BOL). |
| Document number | Enter the BOL number for the shipment. |
| Delete the entire ASN | Allows you to re-do the ASN if you have made a mistake. |
| See/Modify Partner for Document | Answer yes if you want to change the partner information when entering the ASN. |
| Do you want to scan this ASN. | Answer yes if your method of input will be via scanner. A scanner may be used to facilitate the entry of item numbers when assigning them to cartons. |
Last update October 20, 2006