Menu Access:
Character: EDI 4 8
GUI: EDI; Tasks or Transactions
Use this function to edit transaction sets stored in the transaction set holder file.
Transaction sets are stored in the transaction set holder file when they are loaded into
the system using the Load EDI Data function, or the Receive EDI Data function has
determined that there are errors in a transaction set. EDI data will also be loaded into
the holder files for documents that are not currently
supported. This feature allows you to look at or generate reports for any EDI data.
You will be prompted for the transaction set that you want to use. To do this, enter the
transaction set identification number assigned to a particular transaction set. You can
also use the |UP/DOWN ARROW| keys to browse the transaction sets stored in the transaction
set holder file. If you enter a transaction set identification number that is not on file,
you will receive an error message, and be prompted for another transaction set
identification number.
If you wish to delete a transaction set from the transaction set holder file, enter the
transaction set identification number of the transaction set that you want to delete and
press the |ZAP| key. You will be asked to confirm whether or not you want to delete the
transaction set in question.
After selecting the transaction set that you want to work with, you can then change the
transaction set's "on hold" status. The "on hold" status determines
whether or not the transaction set will be processed by the Receive
EDI Data function. A transaction set should be put "on hold" if additional
information is required before the transaction set is processed, or you want to control
when the transaction set is to be processed by the Receive
EDI Data function. Change the "on hold" status if necessary.
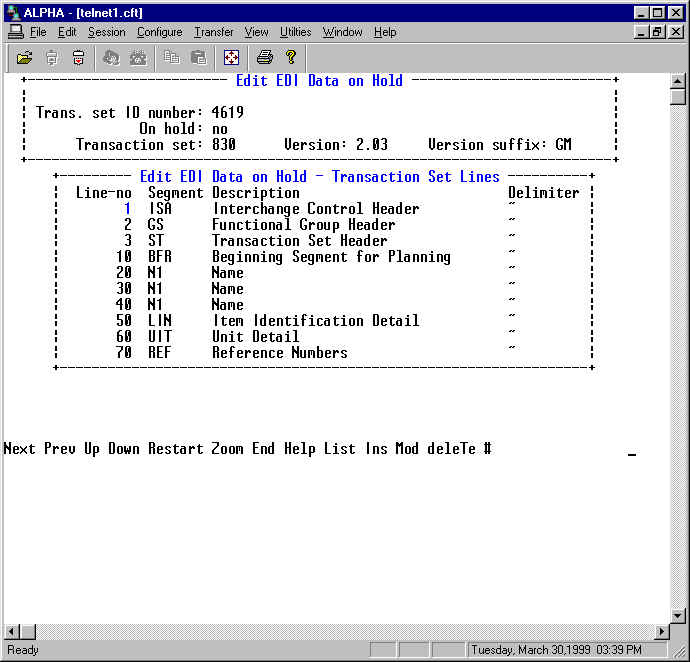
A second frame will then appear, detailing the transaction set lines used in this
transaction set. To move between records, use the |UP/DOWN ARROW| keys. You can also
browse the lines of the transaction set you are working with by using a variety of browse
options.
In addition to the regular Browse/Zoom options, the following options are also
available:
Insert Mode
Pressing "I" while browsing records displays an "Insert" frame. This
frame allows you to add new transaction set lines into the transaction set that you are
working with. If there are no transaction set lines on file, then you are automatically
placed in "Insert" mode after choosing the transaction set to work with.
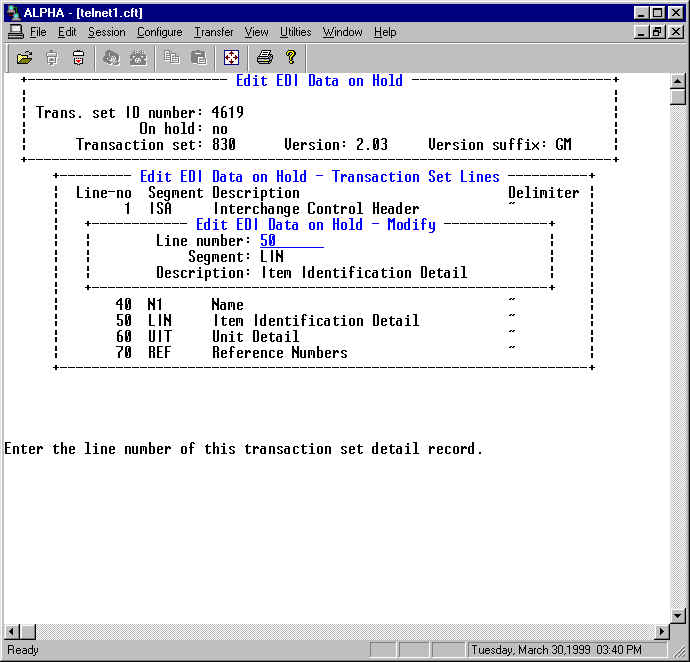
The system then asks for a line number. If that line number already exists, you can modify
the record in question. Otherwise, the system will check to see if the line number entered
is greater than or equal to 10. Line numbers between 1 and 10 are reserved by the system
for "control" segments such as the ISA (interchange control header), GS
(functional group header), and ST (transaction set control header).
You are then prompted for a segment name. If the segment is not used in the transaction
set you are working with, then you will receive an error message.
NOTE: When new transaction set lines are added to a transaction set, the system does not
check to see if you are inserting the line number in the correct order with respect to the
segment being used. You must ensure that you are inserting transaction set lines in the
right place in the transaction set.
After entering the segment name you want to work with, the system will check to see if
there is an "edit" program for this segment in the edit program directory,
as defined by the EDI System Information Maintenance
function. If there isn't, the system will attempt to create it. If it cannot generate the
"edit" program, then you will receive an error message, and you will not be able
to edit the segment.
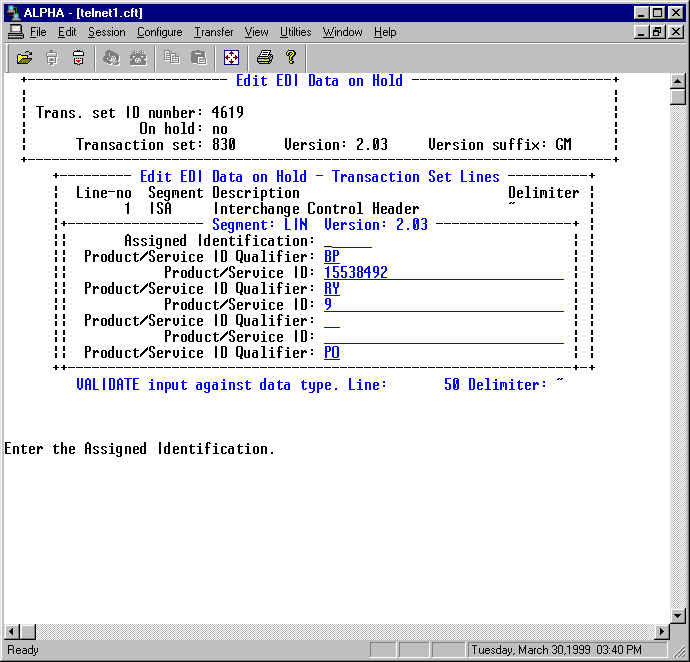
If an "edit" program exists for the segment you are working with, one or more
frames appear, allowing you to edit the fields that make up the segment you are using.
Change the values where necessary. If you try to use the element delimiter as part of a
value of a field that you are editing, then you will receive an error message.
NOTE: The system DOES NOT validate the fields against the data type that should be used
for the field being edited. All the information entered for a transaction set line is
entered as character values. It is therefore recommended that only experienced personnel
be allowed to edit transaction sets stored in the transaction set holder file.
When new transaction set lines are created, the system will use Control-A (ASCII value 1)
as the element delimiter for the transaction set line. This is done so that the newly
created transaction set lines do not cause problems when they are displayed or printed.
Once all the information has been entered for a particular segment, you are prompted for
another line number. The system remains in "Insert" mode until the |END| key is
pressed, then it returns to the browse frame.
If there are no transaction set lines remaining after "Insert" mode is exited,
you are prompted for another transaction set to work with.
Modify Mode
If "M" is pressed while browsing records, a "Modify" frame appears.
This frame modifies existing records. If a record is in use by another user, a message
displays, and the system returns to the browse frame.
The line number, segment name, and segment description are displayed. The values default
to the values from the last record browsed.
The system then asks for a line number. If that line number is already used by another
record in this transaction set, you will receive an error
message and the change will not be accepted.
Line numbers between 1 and 10 are reserved by the system for "control" segments
such as the ISA (interchange control header), GS (functional group header), and ST
(transaction set control header). For this reason, if the original line number you are
working with is greater than or equal to 10, and you try to set it to a value below 10, or
vice versa, then you will receive an error message, and the change will not be accepted.
NOTE: If you change the line number for a given transaction set line, the system does not
check to see if the segment associated with the line is in the correct order in the
transaction set. You must ensure that by renumbering a transaction set line, it remains in
the correct order in the transaction set.
The system will check to see if there is an "edit" program for the segment
associated with this line number in the edit program directory, as defined by the EDI System Information Maintenance function.
If there isn't, the system will attempt to create it. If it cannot generate the
"edit" program, then you will receive an error message, and you will not be able
to edit the segment.
If an "edit" program exists for the segment you are working with, one or more
frames appear, allowing you to edit the fields that make up the segment you are using.
Change the values where necessary. If you try to use the element delimiter as part of a
value of a field that you are editing, then you will receive an error message.
NOTE: The system DOES NOT validate the fields against the data type that should be used
for the field being edited. All the information entered for a transaction set line is
entered as character values. It is therefore recommended that only experienced personnel
be allowed to edit transaction sets stored in the transaction set holder file.
After a record is modified, the system returns to the browse frame, with the cursor
positioned on the next record.
Delete Mode
When "T" is pressed while browsing records, the system asks whether to delete
the record being browsed. The system will not delete a line number if it is being used for
"control" (i.e., ISA, GS and ST) segments. If deletion is selected, the system
will check to see if the transaction set line has any dependent records. If it does not,
then the transaction set line is deleted, and the cursor is positioned on the next
available record (unless the last record is deleted, in which case, the user is positioned
on the next to last record). If all transaction set lines are deleted in a transaction
set, the system prompts you for another transaction set to work with.
Renumbering Lines
If "#" is pressed, a frame will appear giving you the option to renumber
transaction set lines in the transaction set. You will be prompted for the starting line
number to renumber from, the new starting line number to use, and the increment between
lines. If the new starting line number is less than the original starting line number, or
the original and/or new starting line numbers are less than 10 (i.e., are reserved for
"control" segments), then you will receive an error message.
All lines, beginning with the original starting line number specified will be renumbered
from the new starting line number onwards using the increment specified. If the system is
unable to renumber the lines successfully, then an error message will be displayed and the
lines will not be renumbered.
Attaching Memos:
Open-ended memos can be attached to the transaction set holder record, or any line in a
transaction set record by using HyperTools' Attach Memo function, available through the
standard help or by entering ESC-T or ALT-T. You can also select to view the memo, if one
exists, when browsing a transaction set line in a transaction set. These memos are purged
automatically when HyperTools' Print Memo Tags function is run, with the Purge Orphans
parameter set to "yes" and the Print Memos parameter set to "no".
The function allows for two modes; one to edit the raw EDI data, and the other to toggle the Hold switch.
In Edit mode you choose a set in the left pane, the received segments will then be displayed in the right hand pane. Upon choosing segment the EDI data will be displayed in the Details window. You may edit the data in this window as you would any text document using, say, Notepad. You may also insert, delete, or renumber lines in the document. The only caveat would be that you must realize that you are editing the raw data; no validation will be effected.
In Toggle mode you may choose one or many (multi select) documents. Once the documents are chosen click on the Toggle Hold switch to change the status of the document.
Last update October 20, 2006